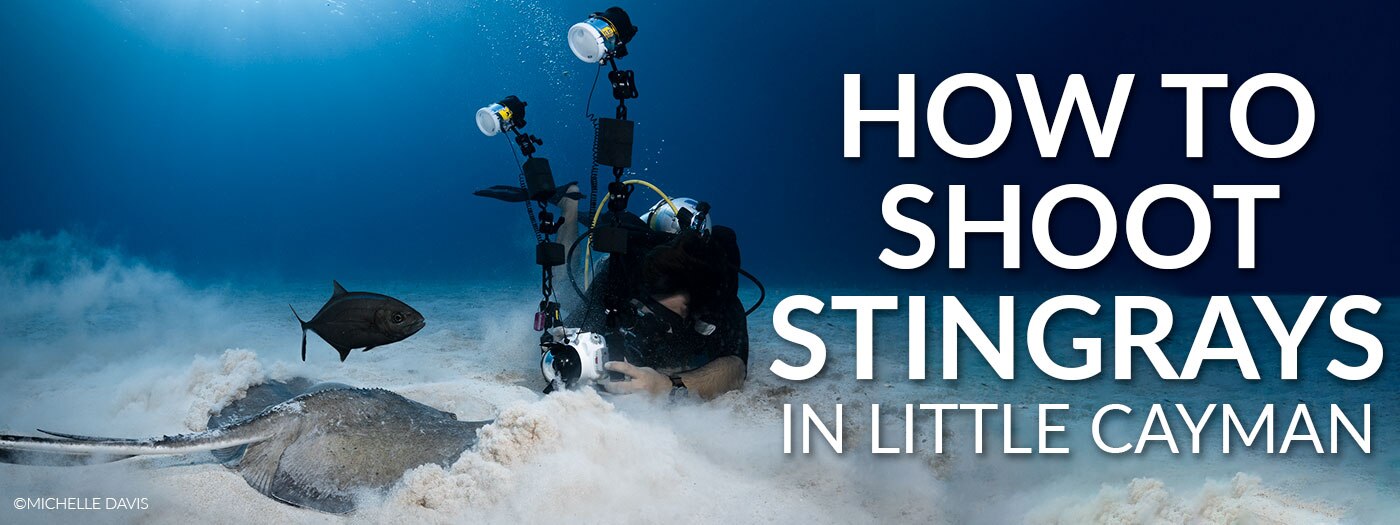
Stingrays Underwater Photo Tips for Little Cayman
Hi there! My name is Tiago Peixoto and you can find me shooting in Little Cayman as the Backscatter Photo Pro for the Reef Divers Photo Center. Little Cayman is truly a fantastic place for underwater photographers for so many reasons. To name a few: clear blue water, the virtual absence of currents, friendly fauna, and some World-Class dive sites only minutes away. On top of that, you will find a top-notch dive operation in Reef Divers, with highly skilled staff, dedicated to helping you get the shots you always wanted. Now, with a dedicated Underwater Photography Center, it is easier than ever to shoot in Little Cayman. Little Cayman’s reef system hosts some very interesting and photographer-friendly characters. Among them are the Southern Stingrays. In this article, we will talk about how to approach them and how to capture some of Little Cayman’s classic shots. Southern Stingray feeding in the sand.Canon 5D IV | Canon 8-15mm | 1/125 | ISO 100 | ƒ11Introducing the Little Cayman Southern Stingrays and Where To Find Them Southern Stingrays (Hypanus americanus) are a common sight along the sandy boulevards of dive sites like Meadows, Eagle-Ray Roundup, Jackson’s Wall & Reef, Cumber’s Caves, Bus Stop, Sarah’s Set, Ann’s Attic, and Mixing Bowl. You can find these mellow elasmobranchs cruising along this stretch in search of their prey that’s usually buried up to 3 inches in the sand. There are several types of photo opportunities available with our stingrays. You can approach them while they rest, covered by a layer of sand, as they feed or - my personal favorite - as they face the camera and turn, creating a very interesting composition with their tail whipping behind them. However, there is one type of shot that doesn’t work as well as these do: is trying to capture them while they cruise around. They will not allow you to get close enough for proper lighting and a planned composition - it’s pretty much like trying to shoot a moving target. I would advise saving your efforts for a more planned and meticulous shot rather than trying your luck as they skate around. Another added interest in capturing stingray images pertains to their entourage. They are commonly seen accompanied by Bar Jacks, Permits, or other fish, which hope to get an easy meal out of the little creatures that get flung up in the water column as the stingray feeds. Catch them in the right position and you will have an added subject to make your shot even more dynamic and full of action. Capturing a stingray with its entourage of other critters is a great way to add more elements and interest to your image. Canon 5D IV | Canon 8-15mm | 1/200 | ISO 100 | ƒ11The Best Gear Set Up To Pull Off The Shot Since our aim is to get extremely close to the stingrays, I recommend using a wide-angle lens or a wet wide-angle attachment for your camera. Ideally, you will be using a fisheye lens for these shots. If you are rocking a Full Frame camera, I recommend the Nikon 8-15mm or the Canon 8-15mm, both fisheye lenses for superb image quality and corner sharpness. For those of you who opted for a Crop Sensor camera, the Tokina 10-17mm is a great lens to shoot fisheye; you can find both Canon and Nikon mount versions. For Micro 4/3 shooters, you can choose between the Panasonic 8mm Fisheye ƒ3.5 and the Olympus 8mm ƒ1.8 Fisheye PRO lenses. My recommendation falls on the latter given the increased sharpness and higher grade optic. Compact camera users have a plethora of wet wide-angle lenses to choose from. You want to use lenses with at least 100-degree of coverage. Most notably the AOI UWL-09 PRO, the Nauticam WWL-1, and my personal favorite if you have an Olympus TG camera, the Backscatter M52 Wide Angle Lens. Other than lenses, for those using cameras with a viewfinder, using a 45-degree viewfinder is the piece of gear that will make you do a little happy dance underwater! The main reason for this is that your camera will need to be, literally, resting on the bottom. This makes it hard to see the image on a screen or through a straight viewfinder because you cannot get low enough. With a 45-degree viewfinder, you will actually be able to see what you are shooting, making it an indispensable piece of gear for finer control of composition. It is also advised to use a smaller sized dome. I’d recommend a 6-inch dome for this shot to allow you to get closer to the stingray. In terms of lighting, a dual-strobe setup is preferred over a single strobe. It is possible to capture these shots with a single-strobe setup, but using 2 strobes just makes it a lot easier to control your lighting and come out with the shot you are looking for. A wide-angle lens is mandatory to get close to the stingrays to pull off a dramatic shot. A single strobe can do the job for the foreground, but dual strobes make the task a little easier.Olympus E-PL10 | Olympus 8mm | 1/200 | ISO 400| ƒ11Get Your Settings Dialed Before The Action Starts The area where the stingrays roam is open and easy to navigate. It’s a very predictable environment in terms of light availability because it’s just a flat area. You will only need to adjust your settings depending on cloud cover and keep the Sun in the same relative position as you shoot. Considering that this area is mainly composed of bright white sand and it stands at about 40-45 feet in the Caribbean - you will find a lot of ambient light being reflected by the substrate. The settings below will help you overcome the ambient light and get more light from your strobes on the subject. The best way to capture the shot is with manual exposure. Automatic settings will not allow for a proper exposure with such bright ambient light conditions mixing with the strobe light. Shooting in manual is actually quite easy once you know the steps to follow. I start with setting my shutter speed and aperture for the ideal settings for the subject. Then I adjust ISO for the ambient light and finally add in the strobes as the last step. Set the Shutter Speed to Freeze the Action I suggest you start between 1/200 to 1/250, depending on how high your flash sync speed will go. This will freeze the ray’s movement and stop that annoying ambient light to creep into your shot. It will also darken the background - which also works out on a particularly sunny day. While Olympus TG-6 shooters don't have direct access to shutter speed control, there is an option in the menu to set a minimum shutter speed. Set the minimum to 1/250. For a more detailed guide on how to set this, check out the Backscatter TG-6 Wide Angle Settings Guide. Set the Aperture for More Depth Of Field Since you are going to be very close to the stingray and with other subjects possibly behind it, I’d recommend starting at ƒ11 for cameras with larger sensors or ƒ8 for Micro 4/3s and Compact cameras. You want to give yourself enough Depth of Field to get your scene in focus, especially when we take into consideration that your focal point is going to be very close to the camera. Set the ISO for Ambient Light Now that the shutter speed and aperture are set, adjust the ISO for the background light. In general, you'll want to have the ambient light about negative 2 stops darker on the camera's meter. This will help the strobes overcome the very strong ambient light. Keep in mind that to achieve a consistent exposure, you will have to keep shooting in the same direction relative to the Sun. As the stingray moves, you will find yourself in a different direction relative to the Sun. Work yourself back into that position by rotating around the stingray when needed. If you are diving in mid-afternoon and the Sun is high in the sky, it will not have a huge effect on your exposure. However, if you are shooting during the early morning or late afternoon, the Sun’s position in the sky will influence your exposure a lot more. Strobe Position and Power Your strobe position will make or break this shot. We are shooting in a wide-open space that lets plenty of light in and a medium that reflects a lot of ambient light - the white sand. The challenge here is to balance the overpowering ambient light with the light coming from your strobes. If you shoot with the strobes behind and alongside your handles you will get two beams reflected on the sand and more light than you want on that bright area. To fix this, simply extend the arms all the way up and grab your strobes, pointing them down straight into the area in front of you, where the stingray will be located. Strobe position on land.Strobe position in-water. Olympus E-PL10 | Olympus 8mm | 1/125 | ISO 400| ƒ11 Now the light from the strobes is further away from the reflective sand and hitting your subject straight from above. This way, you are lighting the stingray evenly and creating a shadow underneath it. This shadow also helps to separate the stingray from the bottom, creating a much more appealing image. Another reason why we use this strobe position is to reduce the amount of backscatter in our shot, particularly when the stingray moves and lifts sand into the water column. When it comes to strobe power, I usually find that at around ¼ or just a tick above it works well. This may vary depending on the strobe you are using. Once the strobe power is dialed in, it's set and forget. Judging Your Exposure - Take a Test Shot The best way to check your exposure is to take a test shot. Put the camera in the sand in the same position as if you were shooting a stingray and pop off a shot. Next, we'll review that image to dial in the background and strobe exposures. 1. Dial-in your Blue Background Place your camera in the sand and tilt it upwards, as described above, and take a shot. You want to aim for a deep blue background. Check your histogram, particularly the blue histogram. The blue histogram is a great way to see how much ambient light is getting into your shot. It does depend on personal preference, but the rule-of-thumb indicates that if the main curve is to the right of center you probably have too much ambient light and need to adjust. Ideally, the blue histogram should be gathered around 3/4 of the way to the left side of the graph. Due to the strong ambient light conditions, you would expose the blue a bit darker than you would for a normal reef scene. Blue Histogram in the correct area for a good background exposure2. Tuning your Strobe Power Now that the ambient light is set, fire off the strobes with the camera in the same position and look at the highlight warning. The highlight warning will show areas of the image that are completely overexposed by blinking those areas on the image. Take the strobe exposure up until the sand has a small amount of blinking and then back it down 1 click. It is ok to have a very tiny amount of blinking in the sand. This will now allow you to properly expose the stingray without overexposing the bright area of the sand. Highlights warning on. The sand is overexposed and losing detailPro-Tip It's hard to see the proper color of the sand on the back of the screen of the camera. Your eyes have adjusted to the surrounding ambient light of the blue water. If you see the sand on the LCD screen look slightly pink, then you know you have the strobe light overpowering the ambient light and you’ve achieved good exposure. If the sand looks white on the screen underwater, then there's too much ambient light in the shot and when you get back on the boat to review the image it will have a cyan color cast to it from the ambient light. Getting In The Right Position All we need now is a cooperative stingray! One thing to consider is the size of the stingray. Smaller individuals are more skittish and you will need longer to gain their trust. A fully grown, adult stingray will tolerate your presence quicker. If you feel that the stingray you are trying to get close to is not receptive to your approach, just move on. There are plenty of fish in the sea. Once you successfully approach the stingray, it’s time to position yourself and your camera for the best possible framing. As you move your body to get in the right position, it is crucial to keep a fine control of your buoyancy to avoid lifting sand that will invariably enter your frame and ruin your shot. One way to do this is to keep your fins and knees off the sand and move slowly. Now that you’ve found your position, get your camera right on the sand - have a look to make sure you don’t have any sensitive organisms underneath (that includes algae) - and you can even bury the base of your housing ever so slightly. Tilt the camera up so that the stingray features in the bottom half of your frame. By following these tips, you have just successfully reduced the space occupied by the sand in your image and you got a pretty impressive point of view, face-to-face with these awesome creatures. Note how the camera is tilted back to minimize the sand present in the frame.Nikon D850 | Nikon 8-15mm | 1/125 | ISO 400 | ƒ11This is the result if the camera isn’t tilting up but pointing down instead. Olympus E-PL10 | Olympus 8mm | 1/200 | ISO 200 | ƒ9 There are two classic situations to capture these stingrays - The Feeding Shot and The Whip Shot - which involve different techniques and a different approach. The Feeding Shot You will come across the opportunity to capture this behavior if you are diving along the stretch of sand in the Jackson Bight section of the Bloody Bay Marine Park. This sand area lies at about 40 feet and separates the main wall from the smaller reef wall, closer to the shore. It runs parallel to the island and it’s a wide-open space, making it very easy to navigate and avoid any obstructions. Here, you will find the stingrays cruising around, looking for food, and it’s not uncommon to see up to 6 of them around the same area. So plenty of choices when it comes to subjects. Stingray Feeding ShotCanon 5D IV | Canon 8-15mm | 1/200 | ISO 100 | ƒ11 Once you identify your subject, follow along its side while pretending to be an oversized Bar Jack. If you swim slowly and control your buoyancy as you cruise with it, you are allowing it to relax and not see you as a threat. This way you are not chasing it but tagging along for the ride if it accepts you. If the stingray doesn’t want to be bothered it will just take sharp turns away from you. It’s better to choose a different stingray instead of wasting time on a non-cooperative subject. If all goes well, at this point, the stingray will most likely be looking for its prey. Wait for it to get a bite and start rotating from side to side as it tries to dig something out of the sand. When you see that it caught something, you can now move in until you are inches from the stingray’s snout. It will ignore you as it is now fully focused on feeding. Keep shooting! Keep hitting that trigger button until it lifts off to resume it’s cruising. The main reason why you want to take a flurry of shots is because of how quick the action happens. You don’t want to miss the perfect shot before your frame is covered in sand. By creating a filmstrip of shots, you can later choose the best one out of them. Filmstrip of captures to ensure you do not miss the action. You can then choose the one you prefer.Olympus E-PL10 | Olympus 8mm | 1/200 | ISO 400 | ƒ11The Whip Shot On Mixing Bowl, you can find a little stingray pit-stop area. This is where the sandy boulevard meets a reef wall that lies perpendicular to shore and to the main wall. It’s the turnaround point for the rays and where they take some time to rest before resuming their foraging. Here, you will most likely find multiple stingrays that have buried themselves in the sand. You will be able to see their eyes sticking out when you’re scanning out the sand. Once again, these animals are very tolerant of divers so by observing good buoyancy you will be able to get close to them as they rest and keep an eye on you. Approach them from the front, slowly inching closer. Make sure that you have your settings dialed in and your composition set in your mind’s eye. You will reach a point where the stingray will dart out of the sand - this is what you want to capture! When this happens, you won’t have time to change settings. We are talking about fractions of a second for that perfect shot! So when you see the stingray fidgeting and, what can be described as, “swelling up” - press your shutter and let a flurry of shots out to capture the stingray lifting off the sand and whipping its tail in a rotation movement away from you. Stingray Whip shot.Olympus TG-5 | 1/125 | ISO 100 | ƒ8 A quick tip here: Backscatter CEO Jim Decker says that the majority of stingrays are right-handed and I agree! Prepare to have it come out of the sand by rotating to its right side. One other camera setting that can be particularly helpful for this situation is the Continuous Shooting, especially if you are shooting with an Olympus TG-6. Set your Olympus TG-6 up for Continuous Low and you will have a constant preview on the screen as you capture a rapid number of shots - provided that your strobe recycling time can keep up. To account for this, we aim to shoot at a higher ISO value and use a lower Strobe Power setting for faster recharging. Additionally, on the Olympus TG-6 you can set up the internal flash power manually. Select 1/64 to allow for a quicker sequential flash output and save battery at the same time. DSLR cameras can fire a lot quicker when you press the shutter so you don’t necessarily need to use a Continuous Shooting mode. If you are using a Mirrorless, you will need to have image review turned off or shoot in continuous otherwise, you'll have the image playback come up every time. If you do shoot in Continuous Mode make sure that you set the speed up so that you don't shoot faster than the strobes can recycle. Tagging along with a stingray as it forages the sandNikon D850 | Nikon 8-15mm | 1/200 | ISO 400 | ƒ11Getting close for the shotNikon D850 | Nikon 8-15mm | 1/200 | ISO 400 | ƒ11 Where to Aim the Focus Point When it comes to focusing, it is crucial to have the eye in focus. Put the focus point right on the eye - with an ƒ8 or ƒ11 (depending on sensor size) or higher you will have plenty of Depth of Field to achieve that. Still, I advise you to review carefully and repeat the shot if necessary. Additionally, I like to select my focal point manually and move it to the bottom of the frame. This is especially helpful if you are shooting blind or if you are not using a 45-degree viewfinder. Canon 5D IV | Canon 8-15mm | 1/125 | ISO 100 | ƒ11 A tool in your camera that can help keep your critical focus on the stingray’s eye is Continuous Autofocus. You should set your focal point on the eye of the stingray and keep that back AF-ON button pressed while you release your shots. If your camera has a strong tracking mode this will pretty much solve all your focusing issues - that’s another advantage of the Nikon D850 and the Sony a7R IV. Those using the Olympus TG-6 will benefit more from keeping it on Single Focus and taking advantage of the continuous shooting mode. Composition By following the last paragraphs you should already have a pretty strong composition. Be mindful not to cut off any part of the stingray or any of the other subjects by keeping an eye on the edges of the frame. Because these shots are action-packed, you want to maximize your camera’s ability to shoot fast. This is why we recommend a slightly higher ISO and lower Strobe Power - your strobes will be able to recycle much faster and output more frequently for a good exposure. So just before the action begins, start shooting until the stingray moves away. Out of those shots, usually, somewhere in the middle, you will find your action shots with an impressive composition. Nikon Z7 | Nikon 8-15mm | 1/200sec | ISO 64 | ƒ8 When you find a stingray with company, the Bar Jacks and other fish sometimes swim between the ray and the camera. Ideally, you want to capture the shot when they are behind the ray or by its side. There are a lot of variants for their positioning, but as long as they aren’t covering the stingray and, most importantly, its eye, you will get a strong capture. As we mentioned earlier, keep in mind the Sun’s position and work your position around the action to ensure a consistent exposure. Conclusion These remarkable creatures will ensure you have a fun time shooting underwater with a myriad of ways to capture their daily habits. With the right approach, settings, and more importantly strobe position, you will be able to get some amazing shots. Here is a quick summary on how to get this shot: 1. Dial your settings. Start somewhere in the vicinity of a Shutter Speed of 1/200-1/250, Aperture ƒ11, and ISO 200-400.2. Position your strobe all the way up and pointing downwards.3. Get your camera in the sand and tilt it up slightly.4. Take the test shots.5. Review the background, highlight warning, and the foreground sand tone. Adjust accordingly to achieve a good exposure.6. Approach the stingray. The method here will depend if you are going for the Whip Shot or the Feeding Shot.7. Anticipate when the action starts and release a flurry of shots as it unfolds.8. Review your captures and go get some more! You will be able to find plenty of subjects to practice in the sandy stretches of Little Cayman to become a certified stingray photographer! About The Author Born in Portugal, Tiago began his photography adventure in 1999 and stepped into the underwater photography world in 2009 while working in Tanzania as a dive instructor. After more opportunities to shoot in Portugal, Mexico and Mozambique, in 2016 he moved to Little Cayman to continue his work in the dive industry. He has been living there since and in 2019 he joined Little Cayman Beach Resort as a Photo Pro. Tiago studied Marine Biology and Ecology, earning his Master's degree from the University of Lisbon before becoming a certified diving instructor in East Africa. Combining his love for the ocean with his passion for photography was what made him take the step to get his first underwater camera. One of his favorite projects includes donating to charity events that focus their projects on Little Cayman and the Cayman Islands. Want To Dive With Tiago? Contact Our Travel Company Under Exposures & Book A Trip!BOOK A TRIP
Related Posts
Best Underwater Action Camera Settings Guide
What kind of action camera diver are you? Do you capture clips here and there on your dive, spend your entire time underwater shooting video, or use an action camera alongside a larger, dedicated came...
Read More 
Backscatter AOI QRS Quick Release Lens System Installation Guide
The AOI Quick Release System (QRS) offers a convenient way to store and swap lenses for AOI and Backscatter lenses. When used with the Backscatter Double Handle and Tray and The Arch, the system posit...
Read More 
Complete Guide For GoPro HERO13 Best Underwater Video & Photo Settings
The GoPro HERO 13 Black is the best camera from GoPro to date and is our favorite action camera. The GoPro HERO13 has upgraded battery life for longer shoots, super smooth image stabilization, and a s...
Read More 
Interviews with the Pros: Shooting Subjects Big and Small with Dustin Adamson
From humpback whales to nudibranchs, tiger sharks to flamboyant cuttlefish, Dustin Adamson has shot it all. In this interview, Dustin shares key insights on the gear he uses, as well as his process an...
Read More 
Remote Lighting with Backscatter Hybrid Flash, Atom Flash, Mini Flash 3, & Mini Flash 2 Underwater Guide
One of the standout features of the Hybrid Flash and Mini Flash 2 is Remote Mode. Unlike a simple slave mode, Remote Mode allows for remote triggering and adjustment of power levels on an off-camera H...
Read More 
Documenting Marine Conservation with Edwar Herreño
Backscatter pro client and affiliate Edwar Herreno is a marine biologist, technical diving instructor, conservationist, and award-winning freelance underwater photographer and filmmaker. His work has ...
Read More